
The web development landscape is rapidly evolving, particularly when it comes to building GenAI applications. With Vercel’s recent release of AI SDK 3, they have introduced “Generative UI” technology, enabling the integration of customized interactive user interfaces with AI. You simply provide a set of functions, and a large language model (LLM) determines which ones to call based on the user’s input. The Vercel AI SDK takes care of the intricate task of bridging your application code with an LLM.
In this guide, we’ll be building an example application — a vacation house rental platform — to showcase how simple it is to create a fast, type-safe, and maintainable application using Vercel’s exceptional SDK, EdgeDB, and Next.js. Our example rental platform will be interactive, allowing users to effortlessly browse, book, and add houses to their wishlists.
By the end of this guide, you will:
-
Learn how to set up a Next.js project integrated with Vercel AI SDK and EdgeDB.
-
Design a database schema for an example application that is both comprehensive and realistic using EdgeDB.
-
Implement generative UI functionality, enabling users to ask questions and interact with the application using natural language.
If you’re eager to dive into the code, feel free to explore it on GitHub. Additionally, our example application has been deployed to Vercel and EdgeDB Cloud so you can try it out.
This blog post will skip details like styling and the UI implementation and will instead focus on building the core of an AI-powered application with EdgeDB.
Tech stack
Vercel AI SDK is a development kit to build AI-powered apps with React. It provides a set of tools to create interactive and dynamic user interfaces using AI models. The SDK enables you to define actions, tools, and UI components to interact with the AI model and render the UI based on the model’s responses.
EdgeDB is a next-generation, high-performance database that introduces a modern data model and a type-safe query language, effectively solving the n+1 problem. EdgeDB is optimized to pair with TypeScript and React Server Components making it an excellent choice for developers seeking efficiency and reliability.
Setting up your project
Before diving into the code, ensure you have Node.js installed on your system. Then, we can initialize a new Next.js project and install the necessary dependencies:
$
pnpm dlx create-next-app@canary edgedb-ai-app$
pnpm install ai openai zod edgedb @edgedb/generateNext, create a file named .env.local and include your OpenAI API key
like so:
OPENAI_KEY="<your-openai-api-key>"After your Next.js project is ready, install the EdgeDB CLI and initialize your project, which will create a new database:
$
curl --proto '=https' --tlsv1.2 -sSf https://sh.edgedb.com | sh$
edgedb project initDesigning database schema with EdgeDB
In EdgeDB, we define the data structure through a schema. For a rental platform, we’ll need to define object types (similar to tables in traditional databases) for houses, reviews, and bookings. Below is an example schema:
module default {
  type House {
    required title: str;
    required description: str;
    required location: str;
    required price_per_night: float64;
    required max_guests: int16;
    required no_of_rooms: int16;
    required no_of_beds: int16;
    required rating: float64;
    required amenities: array<str>;
    required photos: array<str>;

    multi reviews: Review;
    required no_of_reviews := count(.reviews);
  }

  type Review {
    required reviewer_name: str;
    required rating: float64;
    required comment: str;
    required house: House;
  }

  type Booking {
    required startDate: datetime;
    required endDate: datetime;
    required house: House;
  }
}
To create and apply a migration for your schema, use:
$
edgedb migration create$
edgedb migrateNow, to generate an EdgeDB TypeScript query builder, run:
$
npx @edgedb/generate edgeql-jsImplementing Generative UI
To integrate Generative UI functionalities into the application, we’ll
begin by setting up the necessary functions in the app/action.tsx file.
This setup involves initializing AI clients, creating handler functions
for user inputs, and defining the AI state and UI components. Let’s break
down these steps in detail.
Step 1: Initializing OpenAI and EdgeDB clients
import { createClient } from "edgedb";
import { OpenAI } from "openai";

const openai = new OpenAI({
 apiKey: process.env.OPENAI_KEY,
});

const client = createClient();-
The OpenAI client (
openai) is initialized with your OpenAI API key, which is securely stored in the.env.localfile. This client will be used to send requests to OpenAI’s API. -
clientis an EdgeDB client we will use to run queries.
Step 2: Creating a handler function for user input
The core of the generative UI implementation is a handler function that
processes user inputs. This function, submitUserMessage, takes the
user’s input as a string and performs several key actions:
import { getMutableAIState, render } from "ai/rsc";

async function submitUserMessage(userInput: string) {
  "use server";

  const aiState = getMutableAIState<typeof AI>();

  aiState.update([
    ...aiState.get(),
    {
      role: "user",
      content: userInput,
    },
  ]);

  const ui = render({
    model: "gpt-4-0125-preview",
    provider: openai,
    messages: [
      {
        role: "system",
        content: `\
  You are a house booking assistant. You can be asked to get information
  for a house or get a list of houses.
  If you can't find an appropriate function, tell the user to ask
  a different question.
    `,
      },
      { role: "user", content: userInput },
    ],
    text: ({ content, done }) => {
      if (done) {
        aiState.done([
          ...aiState.get(),
          {
            role: "assistant",
            content,
          },
        ]);
      }
      return <Message type="bot">{content}</Message>;
    },
    tools: {
      // Placeholder for future tool implementations
    },
  });
  return {
    id: Date.now(),
    display: ui,
  };
}-
The
'use server'directive indicates that this function should be executed on the server side, ensuring sensitive operations, like interacting with the OpenAI API, are not exposed to the client-side. -
getMutableAIStateretrieves and updates the AI state with the user’s input. This state acts as the memory for the conversation, storing each message’s role (user,assistant, orsystem) and content. -
The
renderfunction generates a dynamic UI based on the conversation history. It uses the OpenAI model specified (gpt-4-0125-preview) to generate responses to the user’s input. The function constructs a series of messages, including system-defined instructions and the user’s latest input. -
The
textcallback withinrenderspecifies how to display messages from the AI assistant. When the AI has completed generating a response (doneis true), this response is added to the AI state and rendered as part of the UI. -
The
toolskey allows us to define custom functions to facilitate dynamic AI-driven UI updates within the app. We’ll circle back to this later.
Step 3: Initializing AI and UI states
Before using the AI functionalities, you have to define the initial states.
UIState is what the application uses to display the UI, while AIState
is a JSON representation of all the context the LLM needs to read.
const initialAIState: {
  role: "user" | "assistant" | "system" | "function";
  content: string;
  id?: string;
  name?: string;
}[] = [];

const initialUIState: {
  id: number;
  display: React.ReactNode;
}[] = [];

export const AI = createAI({
  actions: {
    submitUserMessage,
  },
  initialUIState,
  initialAIState,
});-
initialAIStateandinitialUIStateare arrays that will hold the history of interactions (for AI) and the rendered UI components, respectively. -
createAIis a function from theai/rsclibrary that initializes the AI context for your application, registering thesubmitUserMessagefunction as an action and setting the initial states.
Step 4: Wrapping the application with the AI Provider
Finally, to make the AI functionalities available throughout your application, we must wrap our app’s components with the AI provider. This is typically done in a root layout component, ensuring that any child component can access the AI context and state:
import type { Metadata } from "next";
import { Inter } from "next/font/google";
import { AI } from "./action";
import "./globals.css";

export default function RootLayout({
   children,
}: Readonly<{
   children: React.ReactNode;
}>) {
  return (
    <html lang="en">
      <body className={inter.className}>
        <AI>{children}</AI>
      </body>
    </html>
  );
}

export const dynamic = 'force-dynamic'
The force-dynamic setting is currently required to enable
UI streaming in “node” environment on Vercel. It may not be
necessary in the future.
Fetching and displaying a list of houses
As our AI acts as booking assistant, we need to implement a feature that allows users to fetch a list of available houses. This process involves querying your database, filtering results based on certain criteria, and rendering the fetched data in a user-friendly manner. Let’s again break down the steps and code involved in achieving this.
Step 1: Fetching houses from the database
The getHouses function is designed to query your database for a list of
houses, with an optional limit on the number of results returned. This
function uses EdgeDB’s query builder to make the query programmatically
and infer its return type.
async function getHouses(limit?: number) {
  const housesQuery = e.select(e.House, (house) => ({
    ...e.House["*"],
    limit: limit,
    order_by: {
      expression: house.rating,
      direction: e.DESC,
    },
  }));

  const houses = await housesQuery.run(client);
  return houses;
}-
The function accepts an optional
limitparameter, allowing us to control the maximum number of houses the query returns. -
It constructs a query using EdgeDB’s
selectmethod, fetching all properties of theHouseobject and applying an optional limit. -
The results are ordered by the
ratingproperty in descending order, ensuring that higher-rated houses appear first. -
Finally, the query is executed using the
runmethod on theclientinstance, and the fetched houses are returned.
The types for the query builder are generated by the edgeql-js package
we installed earlier. The type of the house object is automatically
inferred based on the schema we defined.
Step 2: Integrating the function into the Generative UI
To make the getHouses function accessible within the Generative UI,
we define a tool called get_houses_list within the tools object.
We wanted it to be a bit more dynamic in terms of displayed UI, so this
function is also configured to accept parameters for selecting properties
of the houses to be displayed:
 tools: {
  get_houses_list: {
    description: `
      Get the list of houses. You can filter the houses using
      EdgeQL query and filters. You can also select the properties
      you need.`,

    parameters: z.object({
      limit: z.number().optional(),
      propertiesToSelect: z.array(
        z.enum([
          'id',
          'title',
          'description',
          'location',
          'price_per_night',
          'max_guests',
          'no_of_rooms',
          'no_of_beds',
          'amenities',
          'photos',
          'no_of_reviews',
          'rating',
        ])
      )
    }),

    render: async function* ({ limit, propertiesToSelect }) {
      yield <Spinner />;
      const house = await getHouses(limit);
      aiState.done([
        ...aiState.get(),
        {
          role: 'function',
          name: 'get_houses_list',
          content: JSON.stringify(house),
        },
      ]);
      if (!house) {
        return <p>House not found</p>;
      }
      return (
        <Houses
          houses={house}
          properties={propertiesToSelect}
        />
      );
    },
  },
}-
parametersdefines the inputs the tool accepts, such aslimitandpropertiesToSelect. These parameters allow for flexible querying and filtering based on the user’s request. -
The
renderfunction is an asynchronous generator function that first displays a loading indicator (<Spinner />). It then fetches the houses using thegetHousesfunction with the specifiedlimit. -
After fetching the houses, the results are processed and added to the AI state. If no houses are found, a message is displayed.
-
Finally, the fetched houses are rendered using a hypothetical
<Houses />component, which takes the houses and the selected properties as props. To see an example of implementing this component, refer to the demo code.
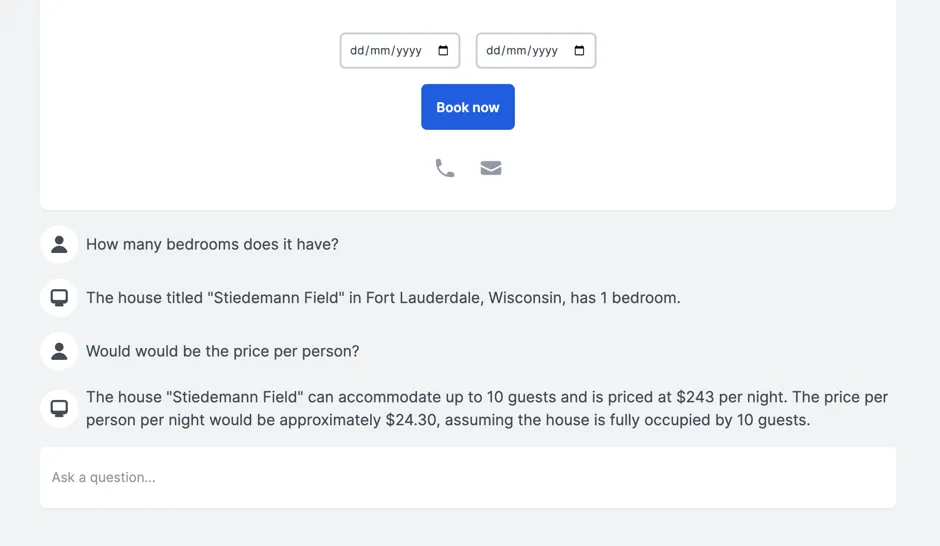
Enhancing user interaction with detailed house inquiries
To further improve the user experience in our rental platform application,
we can enable users to interact with specific houses listed in the Houses
component. This interaction includes clicking on a house to view more details
and asking related questions, such as inquiries about amenities or
availability. This functionality can be achieved by appending a new system
message with the house’s ID to the AI state and ensuring the LLM has the
context of all past messages. Let’s delve into how this can be implemented.
Step 1: Extend the initial system message
We provide a system message which serves as a guide for the LLM to understand and respond to user queries. Let’s update that to include additional instructions for obtaining information about the houses:
"'[houseId = "<houseId>"]' means that the user has selected a specific house.
Use this houseId for detailed queries about that house.
To get detailed information on a specific house, use get_house_info with
the relevant houseId."
This would work great… except that the get_house_info tool we mentioned
doesn’t exist yet! Let’s build it…
Step 2: New tool for specific house details
Next, we can define a new function to handle fetching more information related to a currently displayed house.
tools: {
  get_house_info: {
    description: `Fetch detailed information about
                  a specific house using its houseId.`,
    parameters: z.object({
      houseId: z.string(),
    }),
    render: async function* ({ houseId }) {
      // Implementation to fetch and render
      // house information based on houseId.
    },
  },
  // Additional tools can be defined here to handle
  // other specific queries or actions.
}
Additional tools can be added following a similar pattern to address other specific queries or actions related to houses, such as checking availability for specific dates, viewing reviews, and more.
Step 3: Passing context to the LLM
To enable the LLM to generate responses based on the full conversation history, including selecting a specific house, we can pass all past messages as context when making requests to the LLM. This can be done by retrieving the current AI state and including it in the list of messages sent to the LLM:
async function submitUserMessage(userInput: string) {
  'use server'
  const aiState = getMutableAIState<typeof AI & AIState>()
  const pastMessages = aiState.get()

  aiState.update([
    ...aiState.get(),
    {
      role: 'user',
      content: userInput,
    },
  ])

  const ui = render({
    model: 'gpt-4-0125-preview',
    provider: openai,
    messages: [
      {
        role: 'system',
        content: `...`
      },
      ...pastMessages,
      { role: 'user', content: userInput },
    ],
    // ... rest of the code
})
By maintaining a conversation history and marking specific actions like house selection, the LLM can provide responses that are directly relevant to the user’s current interest or inquiry.
Step 3: Tracking house selection
When a user clicks on a specific house in the Houses component, we can
track this action by appending a new system message to the AI state.
This message includes the selected house’s ID, allowing the LLM to understand
which house the user selected:
const [aiState, setAIState] = useAIState();

setAIState([
  ...aiState,
  {
    role: "system",
    content: `[houseId = "${house.id}"]`,
  },
]);
useAIState is a hook that provides access to the current AI state and a
method to update it (setAIState).
Adding booking functionality
The final functionality we’ll implement is the ability for users to book a
house. This process involves creating a new function, confirmBooking,
aimed at streamlining the booking process for users. This function
encapsulates the booking logic, including UI feedback during the booking
process and updating the AI state with the booking details.
Let’s elaborate on how this function is structured and integrated into the
application.
Step 1: The confirmBooking Function
The confirmBooking function is designed to handle the booking process
asynchronously, providing visual feedback to the user and updating the
system’s state with the booking details.
async function confirmBooking(
  from: Date,
  to: Date,
  houseId: string,
  houseName: string
) {
  "use server";

  const aiState = getMutableAIState<typeof AI>();
  const booking = createStreamableUI(<p>Booking {houseName}...</p>);
  const systemMessage = createStreamableUI(null);

  (async () => {
    booking.update(<p>Booking {houseName}...</p>);

    const bookingQuery = e.insert(e.Booking, {
      from_date: from,
      to_date: to,
      house: e.select(e.House, () => ({
        filter_single: {
          id: houseId,
        },
      })),
    });
    await bookingQuery.run(client);

    const message = `You have successfully booked ${houseName}
                     from ${from.toDateString()} to
                     ${to.toDateString()}. Enjoy your stay!`;

    booking.done(<div>{message}</div>);
    systemMessage.done(<Message type="bot">{message}</Message>);

    aiState.done([
      ...aiState.get(),
      {
        role: "system",
        content: `User has booked ${houseName} from ${from} to ${to}.`,
      },
    ]);
  })();

  return {
    ui: booking.value,
    newMessage: { id: Date.now(), display: systemMessage.value },
  };
}
Here’s a step-by-step breakdown:
-
Initialization: The function begins by marking its execution context as server-side using
'use server', ensuring sensitive operations are not exposed to the client. It then retrieves the mutable AI state, which will be updated upon successful booking. -
Visual feedback: Initially, a streamable UI component is created to indicate that the booking process has started. This component shows a simple animation with three bouncing dots and the message “Booking [houseName]”.
-
Booking process: The function then performs the booking operation. It constructs a query to insert a new booking record into the database, associating it with the selected house and the specified date range.
-
Success feedback: Upon successful booking, the visual feedback is updated to inform the user that the booking has been successfully completed, displaying the house name and the booking dates.
-
System message update: A system message is generated to reflect the successful booking in the AI state. This message includes the house name and the booking date range, providing a transaction record within the AI context.
-
AI state update: The AI state is updated with the new system message, ensuring that the booking details are incorporated into the conversation history.
We’re skipping some business logic here. In a more true-to-life scenario, we’d need to check availability first.
We also need to integrate the confirmBooking function into the AI context
so it can be used within the application:
export const AI = createAI({
  actions: {
    submitUserMessage,
    confirmBooking,
  },
  initialUIState,
  initialAIState,
});
Step 2: Usage in a component
Let’s say the component displaying the house details has a button to initiate
the booking process. Here’s how the confirmBooking function can be used
in this component:
<button
  onClick={async () => {
    if (!bookingDates.startDate || !bookingDates.endDate) {
      return;
    }
    const response = await confirmBooking(
      startDate,
      endDate,
      house.id,
      house.title
    );
    setBookingUI(response.ui);
    setMessages((currentMessages) => [...currentMessages, response.newMessage]);
  }}
>
  Book now
</button>-
When the “Book now” button is clicked,
confirmBookingis called with the selected dates, the house ID, and the house name. -
The function’s response includes the updated booking UI and a new message for the AI state. These are used to update the component’s state, provide immediate visual feedback, and update the conversation history with the booking details.
LLMs that do more
LLMs deal in language, and that means they generally return text. That text is generated based on their training data. Those limitations are fine for some AI applications but for others, we need LLMs to do more. As this app has demonstrated, Vercel’s AI SDK expands the possibility space for LLMs by allowing them to call custom code and fetch data, rendering that with custom UI components. It’s a powerful new set of capabilities that can make LLMs useful in many more scenarios. Add EdgeDB to the stack, and you’ll have a performant data store designed to allow you to iterate on your newly capable AI app with greater speed and efficiency.
But it doesn’t stop there. We can do even more!
Future improvements
Looking ahead, there are several areas where this project can be further enhanced:
-
Incorporating more sophisticated AI capabilities to predict user preferences and suggest personalized house listings.
-
Extending the EdgeDB schema to include more detailed property information, user profiles, and interaction histories for richer data analysis and feature development.
-
Saving conversation history to the database so users can continue their conversations from where they left off.
Read more
For more information on the technologies used in this guide, visit: